This example is a 3D variation of example 4 - Steam Displacement of NAPL in a 2-D Field Scale System - described in the T2VOC User's Guide (Ralta, Pruess, Finsterle, and Battistelli, LBL-36400, 1995).
This analysis is done in four parts. The first part is used to establish an initial gravity-capillary equilibrium state. In the second part, o-xylene is injected for a period of about 55 days. In the third part, the o-xylene is allowed to diffuse for 10 years. The final part is a steam flushing for 171 days. In each case, the ending conditions of the previous part are used as initial conditions for the next analysis.
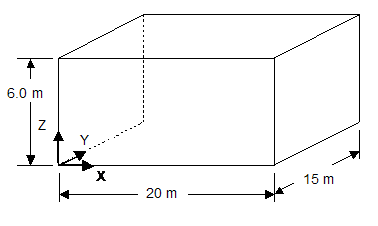
The geometry of the problem is given below. The model represents a 3D (XYZ) rectilinear geometry.
It is recommended that the user follow the description below to create the PetraSim model and the associated T2VOC input file. However, you can download the PetraSim model, T2VOC input, and results files here: part1, part2, part3, part4 (extract the zipped files before reading into PetraSim). These files allow you to view results even if you do not run the T2VOC analysis.
This example uses the T2VOC equation of state (EOS). Select File/Preferences... and specify T2VOC. Then, select File/New... to start a new model that uses T2VOC.
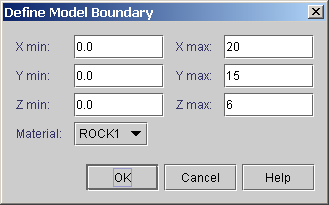
Start PetraSim by selecting Start/Programs/PetraSim. Your display will be a blank window in which we can create the model. In PetraSim, we first define the boundary of the model. Select Model/Define Boundary…and create the model boundary with Xmin = 0.0, Xmax = 20.0, Ymin = 0.0, Ymax = 15.0, Zmin = 0.0, and Zmax = 6.0, as shown below.
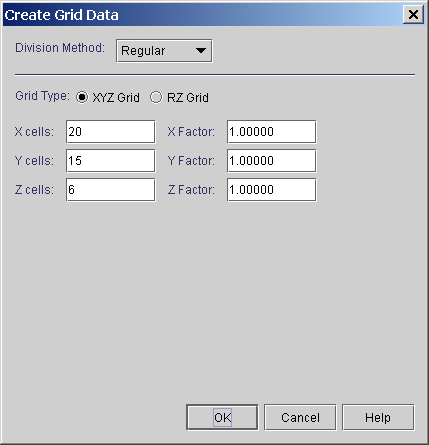
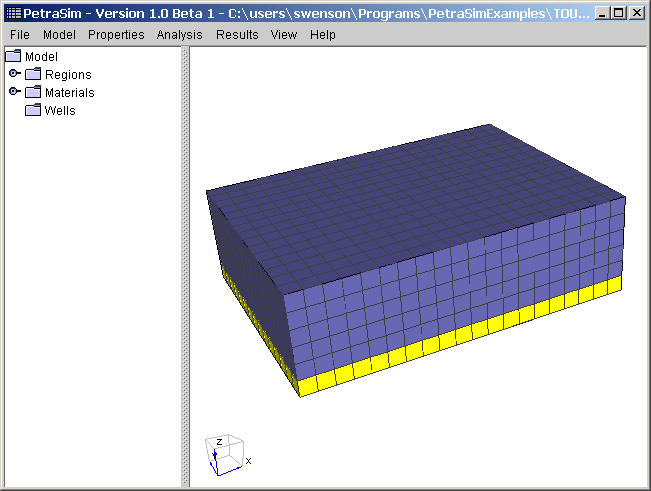
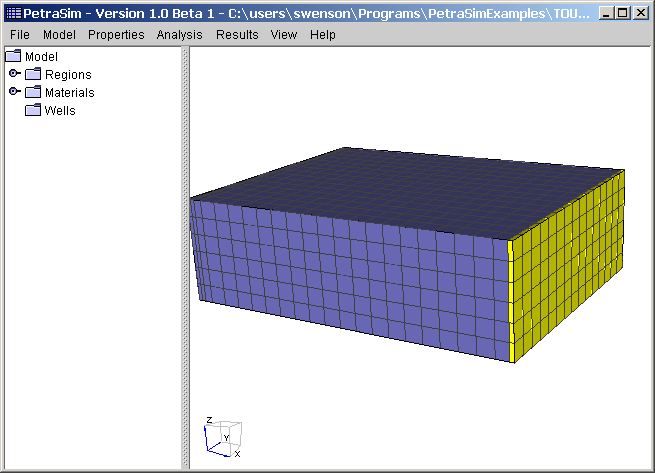
We create the grid on the model by selecting Model/Create Grid… and specify 20 X divisions, 15 Y divisions, and 6 Z divisions, see below. This is a relatively coarse mesh, but allows relatively fast solution times.
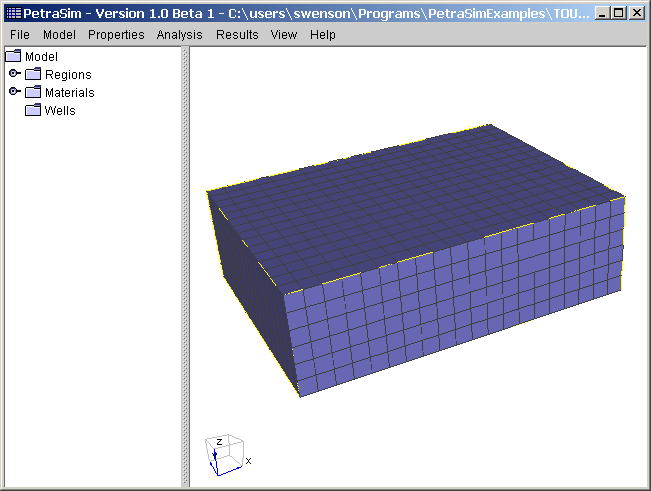
After grid creation, the model is shown below. Click on the model and spin it so that it is displayed as shown below. Hold Shift key and drag to pan; hold Alt key and drag to zoom.
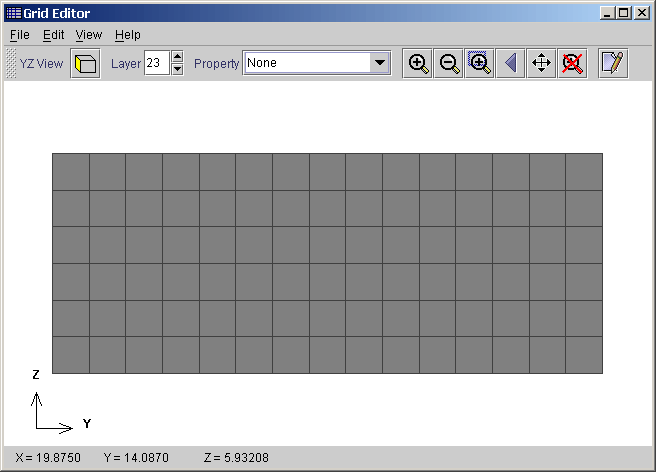
Will will now edit the grid to add some grid lines. To do this, select Model/Edit Grid. The Grid Editor will default to the XY plane and the first layer, as shown below.
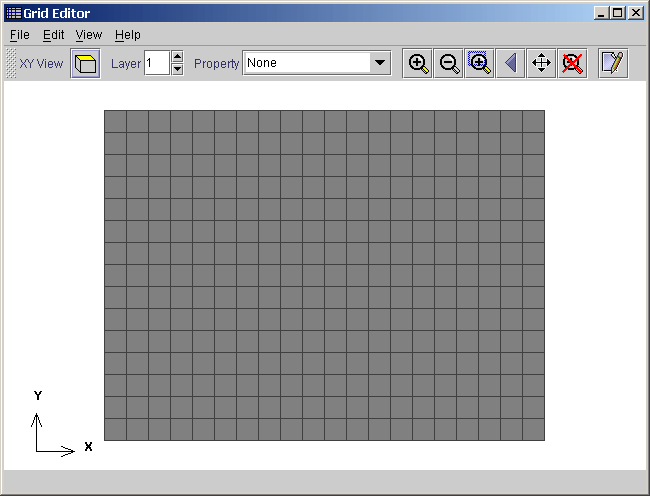
To help orient the user, the layer being edited is highlighted in the 3D window.
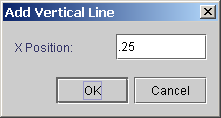
In the Grid Editor, we will now add grid lines to increase grid refinement on the ends where boundary conditions will be specified. Select the menu Edit/Add Vertical Line... and specify the location as X=0.25.
Add two more grid lines at X=0.5 and X=19.75. You will see the new grid lines as you add them.
Close the Grid Editor window.
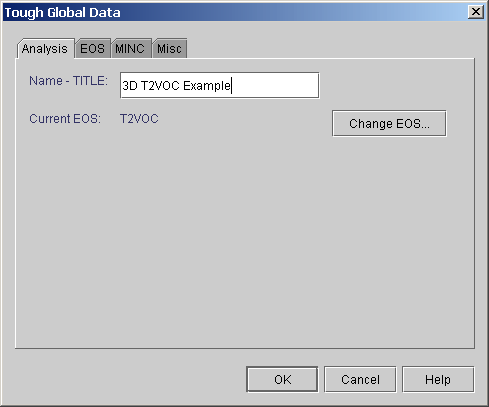
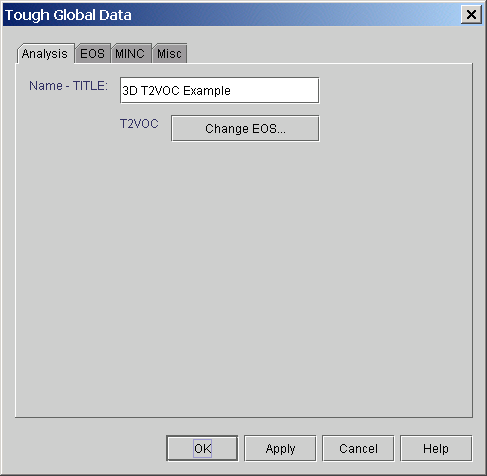
Global properties are those properties that apply to the entire model. Select Properties/Global Properties…to display a tabbed dialog with Analysis, EOS, MINC, and Misc tabs. First select the Analysis tab and change the Name of the analysis to "3D T2VOC Example". Select the Change EOS... button to select T2VOC.
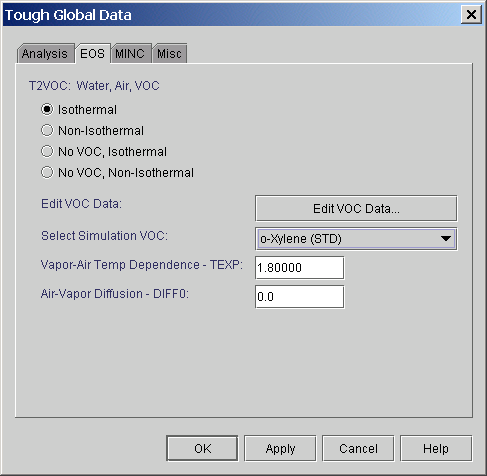
The EOS (Equation of State) tab displays options for T2VOC. In this analysis, we will perform an isothermal (no heat flow) analysis, so select the Isothermal option.
The EOS tab also is where we specify the VOC constants. PetraSim provides a library of standard properties that correspond to the data supplied with the T2VOC distribution. In addition, the user can create their own data sets or modify the existing ones. For this example, we will us a standard set of data for o-Xylene.
In the combo box, select o-Xylene as the VOC.
Select OK to save the changes and return to the main window.
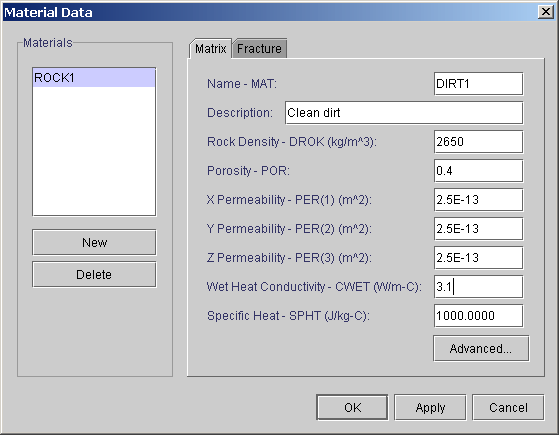
To specify the material properties, select Properties/Materials... as shown below. Change the material name to DIRT1, the rock density to 2650 kg/m^3, the porosity to 0.4, the permeabilities to 2.5E-13 m^2, the wet heat conductivity to 3.1, and the specific heat to 1000 J/kg-C.
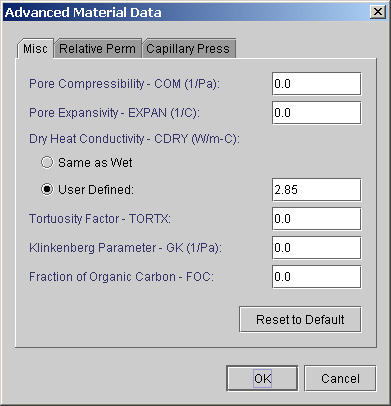
Select the Advanced button to set other options. We will first set the Dry Heat Conductivity to 2.85.
Next, select the Relative Perm tab. This example uses the Modified Stone three phase model for the relative permeability function. Input the constants as 0.1, 0.05, 0.01, and 3.0.
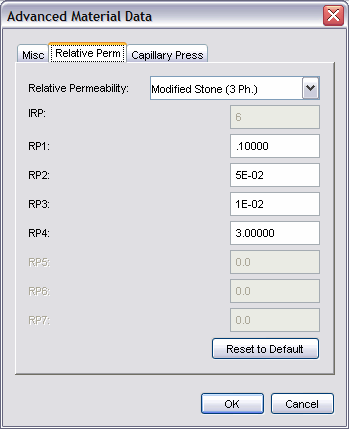
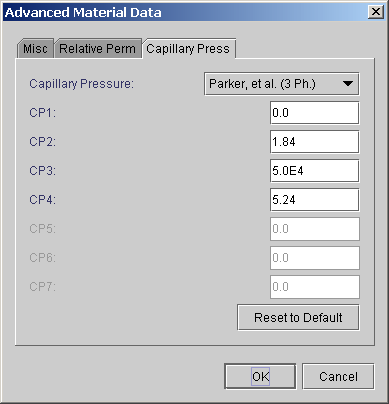
To define the capillary pressure function select the Capillary Press tab and select the Parker model. Input the constants as 0.0, 1.84, 5.0E4, and 5.24.
Select OK to close the Advanced Material Data dialog and the OK to save material data.
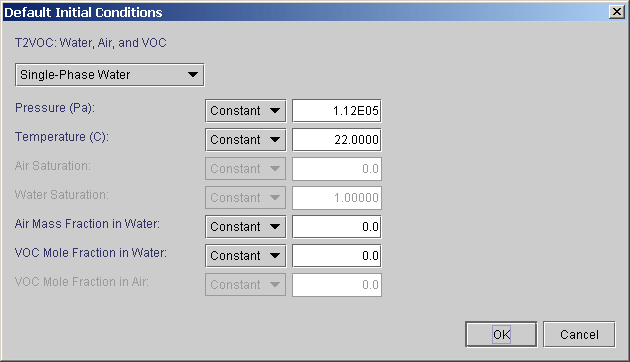
The initial conditions will approximate the distribution of a water table, in which water is at the lower level and air above. To specify the default initial conditions, select Properties/Initial Conditions…. The default initial conditions represent water at a pressure of 1.12E5 Pa and temperature of 22 C. The air and VOC mass fractions are 0.0.
Select OK to close the Default Initial Conditions dialog.
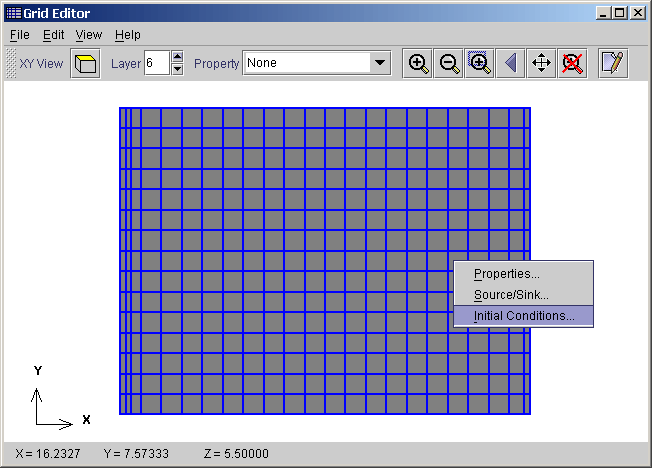
We now specify different initial conditions for the parts of the model that represent the air above the water table. To do this, select Model/Edit Grid and go layer 6 of the XY view (this is the top layer, as can be confirmed in the 3D view). Click and drag with the mouse to select all cells in this layer. Now, right click on the selected cells and select Initial Conditions... on the pop-up menu.
For all these cells, we will specify a two phase condition of water/air with a pressure of 1.01E5 Pa, a temperature of 22 C, a water saturation of 0.1, and zero VOC.

Select OK to close the Initial Conditions dialog.
Repeat exactly the same procedure for layer 5, so that the top two layers (5 and 6) have exactly the same initial conditions.
In layer 4, the third from the top, we will specify two-phase conditions, with a high water saturation. Go to layer 4 and select all cells. For these cells, we will specify a two phase condition with a pressure of 1.01E5 Pa, a temperature of 22 C, and a water saturation of 0.95.
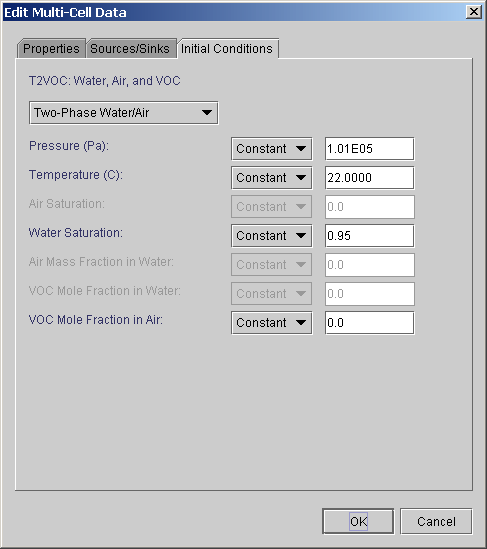
Select OK to close the dialog.
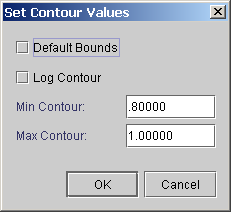
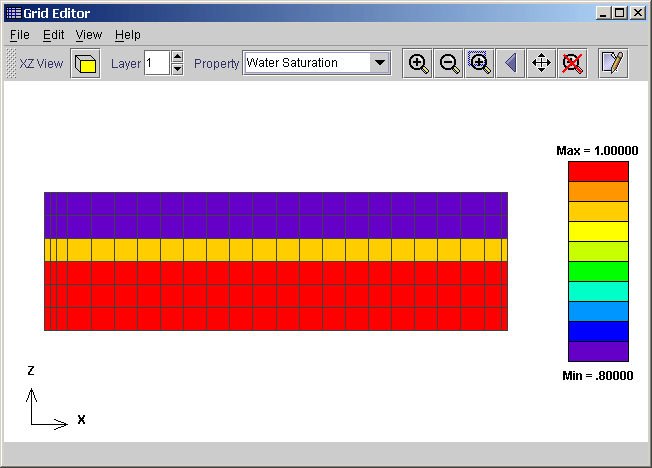
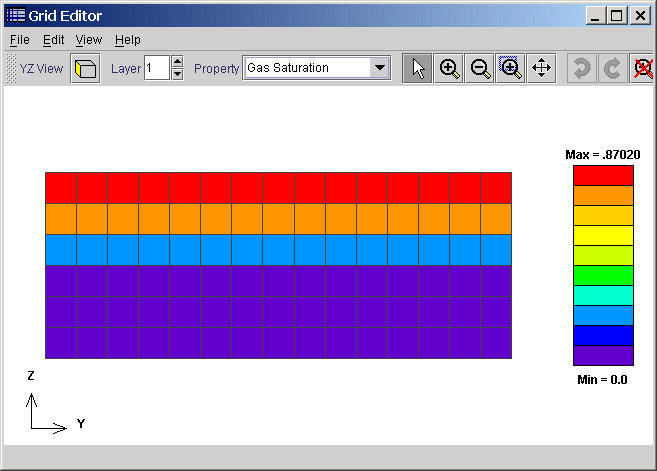
We can display the water saturation by selecting it as the Property to display. Toggle to the XZ view and select Water Saturation. In this display, we also selected View/Contour Range... menu, turned off the Default Bounds checkbox, and set the minimum value to 0.8. This is because PetraSim uses 10 contour colors and the default min and max results in both a saturation of 0.95 and 1.0 being in the same color band.
Close the Grid Editor window.
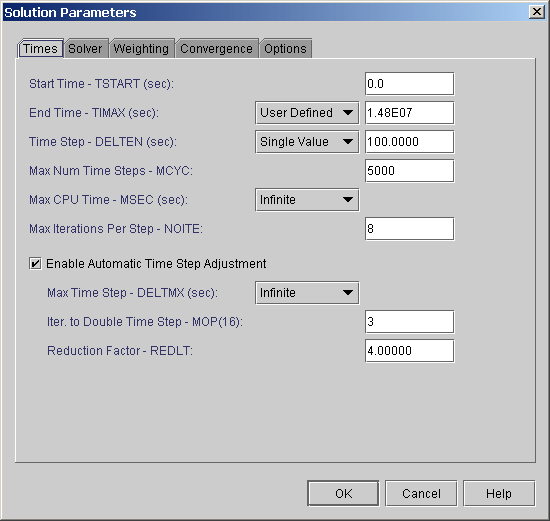
We next specify the information that will control the solution by selecting Analysis/Solution Controls…. The Times tab allows us to specify parameters associated with the start and ending of the analysis and the time steps used for the calculation. In this case, we will start at 0 sec, but not specify an end time. Instead, we limit the maximum number of time steps to 20. This will give enough iterations for the solution to reach equilibrium.
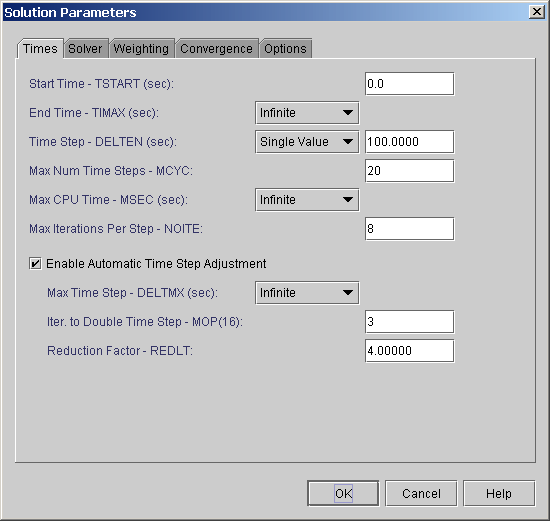
The default values for all other options are satisfactory, so select OK to save the changes.
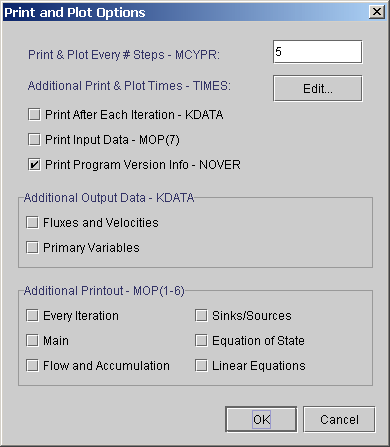
We next specify the information that will control the output by selecting Analysis/Output Controls…. Plot data is read from the TOUGH2 output file. We will output data every 5 time steps.
Select OK to save the changes.
We have now completed the input necessary to write the T2VOC input file. First save the PetraSim file by selecting File/Save… and save the file with the name t2voc3d_part1.sim (the *.sim extension will be added automatically if you do not give it).
Now run the analysis by selecting Analysis/Run TOUGH2... . This will display the Run Tough dialog.
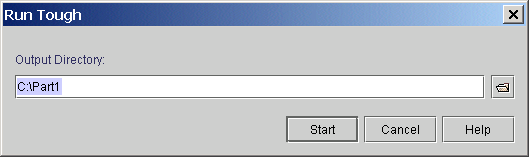
By default the current model and output directory are used for the analysis. This is appropriate for most cases. To start the analysis, select the Start button. During execution the following dialog will be displayed.
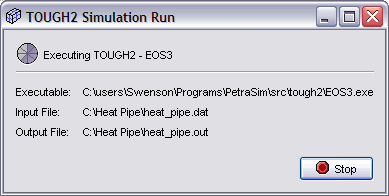
At the end of the analysis, the dialog will change to indicate that the analysis is finished.
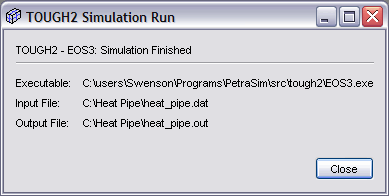
Select the Close button.
If you just want to look at the results without running the analysis, please download the output files that we have already calculated. Links to these files are given at the beginning of this example.
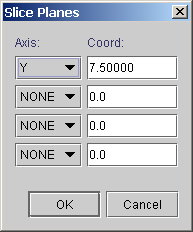
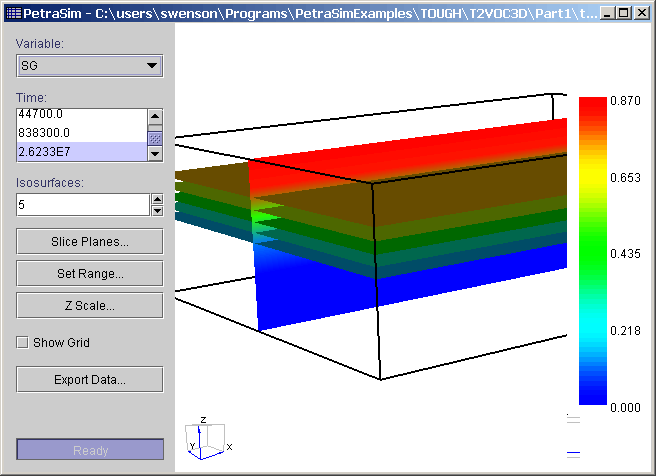
After the analysis is complete, select Results/3D Contours... . This will display a 3D results window. Add a slice plane through the model by selecting Slice Planes... and the define a plane normal to the Y axis at a position of 7.5 m.
Select pressure as the plot variable and select the last time to create a plot as shown below. The pressure gradient increases in the water saturated zone.

The gas (air) saturation is shown below. Air fills most of the upper portion of the model.
Close the results window.
If not already open, start PetraSim and open the t2voc3d_part1 model. We will now save this model to a new directory. Select File/Save As and save the model as t2voc3d_part2. Put this file in a new directory that is different than the directory used for the first analysis. This is necessary because TOUGH2 writes output files to its current directory and we want to avoid overwriting that old analysis.
Note: If using PetraSim Version 1.1, with the September 20 release date, it is necessary to exit PetraSim, restart, and reopen the model file to synchronize the solver directory.
We will first read the results saved in the previous analysis as the initial conditions for the new analysis. Select File/Load Initial Conditions and open the SAVE file that is located in the directory in which the Part 1 analysis was run. The SAVE file is automatically written by T2VOC at the end of an analysis and defines the state at that time.
To make sure these results have been loaded correctly, select Model/Edit Grid, go to the XZ view, and plot Gas Saturation. You can see that the saturation matches that calculated at the end of Part 1.
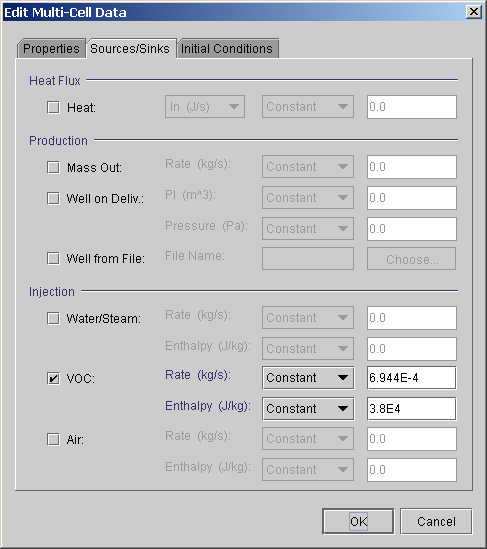
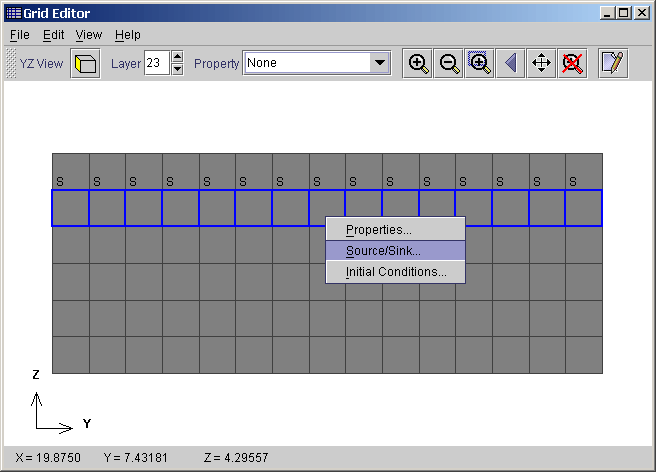
In the next part of the analysis we will define the injection of a total of 20,000 kg of o-Xylene. This will be done over a period of 4.8E6 sec (55.6 days) and distributed over 6 cells, so the rate per cell will be 6.944E-4 kg/s at an enthalpy of 3.8E4 J/kg. The o-Xylene is injected into the top center of the model.
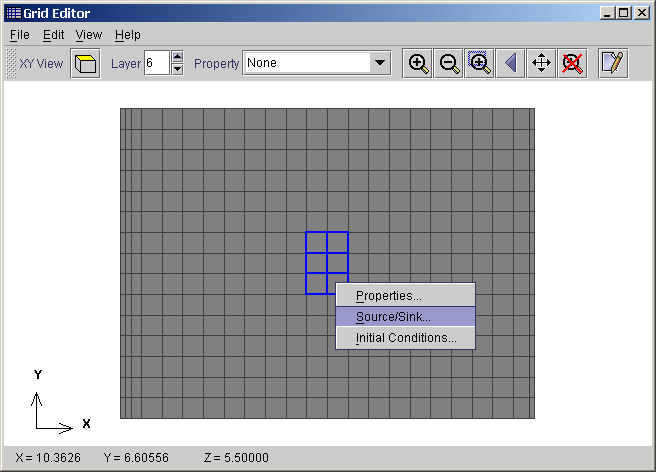
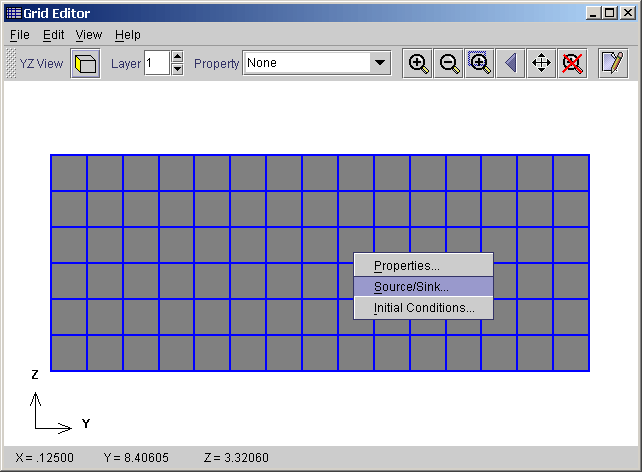
To define this injection, select Model/Edit Grid and go to the XZ View. Go to the top layer (6) and click and drag to select the 6 cells shown below. After selection, right click on the cells and then select Source/Sink from the pop-up menu.
In the Source/Sink tab, select VOC Injection and give the flow rate as 6.944E-4 kg/s and the enthalpy as 3.8E4.
Select OK to close the Edit Multi-Cell Data dialog.
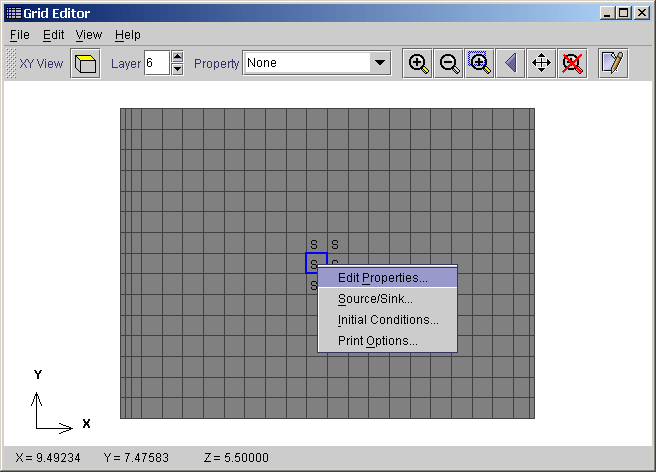
We will now demonstrate how to name and plot a cell history. Select the cell shown below and right click to display the pop-up menu.
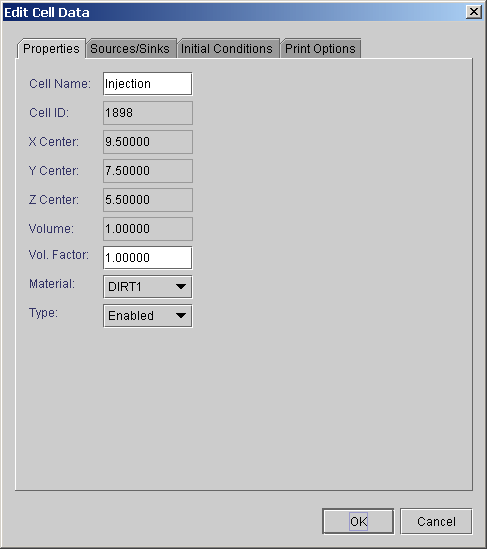
Select the Edit Properties... tab and give the Cell Name as "Injection".
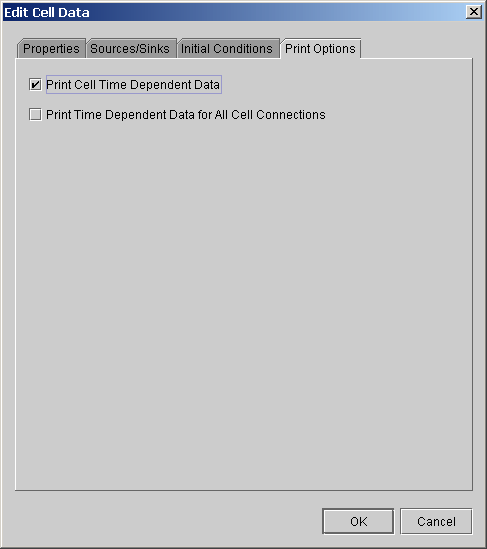
Next, select the Print Options tab and select the Print Cell Time Dependent Data checkbox. This will output data into the FOFT (cell time history data) file. Also, since this cell is a source/sink, the GOFT (source/sink time history data) file will be written by default.
Select OK to close the Edit Cell dialog.
We will also define a deliverability condition on the right of the model. This condition defines a pressure and a productivity index (resistance) for flow to that pressure. In this analysis, the deliverability boundary condition represents an outlet for the flow as the o-Xylene is injected. We will define this condition keeping the pressures the same as calculated in Part 1 of the analysis. This means that the pressure will be different for each layer of the model.
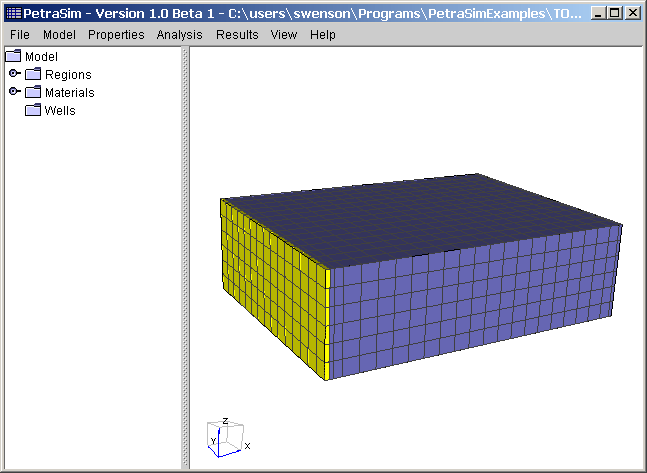
To define the boundary condition, select the 23 layer in the YZ View. This is the last layer on the right side of the model, as confirmed in the 3d view.
In the Grid Editor, use a click and drag selection with the mouse to select all cells in the top layer of the model. After these are selected, right click on the cells to display the pop-up menu.
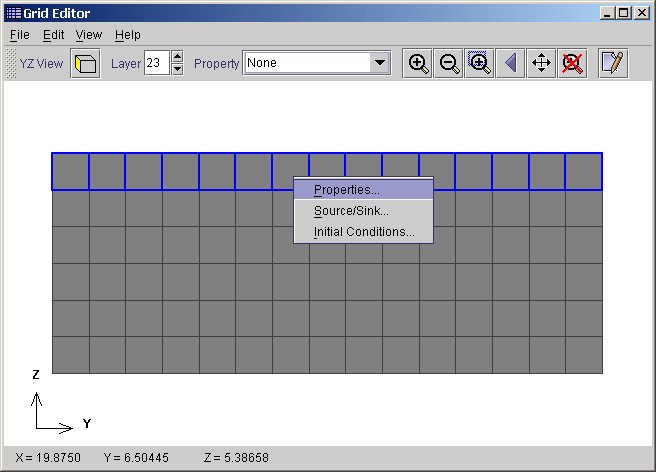
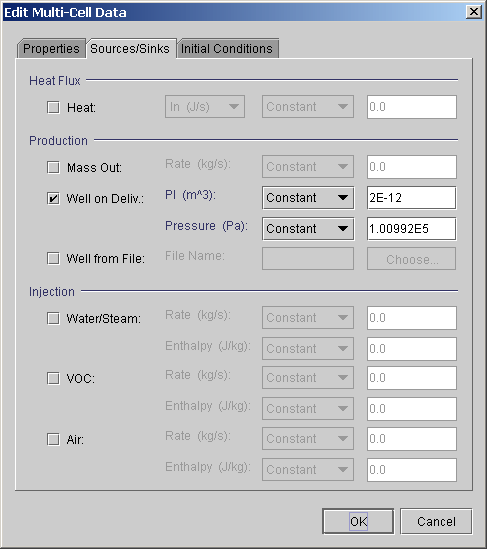
Select Source/Sink in the pop-up menu and select Well on Deliv. for the Production type. Specify the productivity index (PI) as 2E-12 and the pressure as 1.00992E5 Pa.
Select OK to close the dialog.
Now select the second layer from the top and right click.
Select Source/Sink in the pop-up menu and select Well on Deliv. for the Production type. Specify the productivity index (PI) as 2E-12 and the pressure as 1.01004E5 Pa.

Repeat this for the remaining four layers. All layers have the same Productivity Index of 2E-12, but the third layer from the top has a pressure of 1.01015E5 Pa, the fourth layer 1.09362E5 Pa, the fifth layer 1.19151E5 Pa, and the bottom layer 1.2894E5 Pa.
Close the Edit Multi-Cell Dialog and then close the Grid Editor.
For part 2 of the analysis we will start at 0.0 and end at 4.8E6 sec (55.6 days). Specify the time as 4.8E6 sec and the maximum number of time steps as 500.

Select OK to close the dialog.
We have now completed the input necessary to write the T2VOC input file. First save the PetraSim file by selecting File/Save….
As before, execute the analysis by selecting Analysis/Run TOUGH2... . To start the analysis, select the Start button in the Run Tough dialog. At the end of the analysis, the dialog will change to indicate that the analysis is finished. Close the execution dialog.
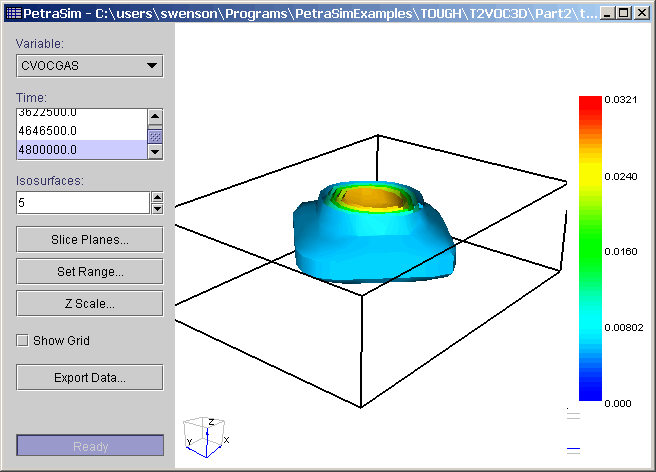
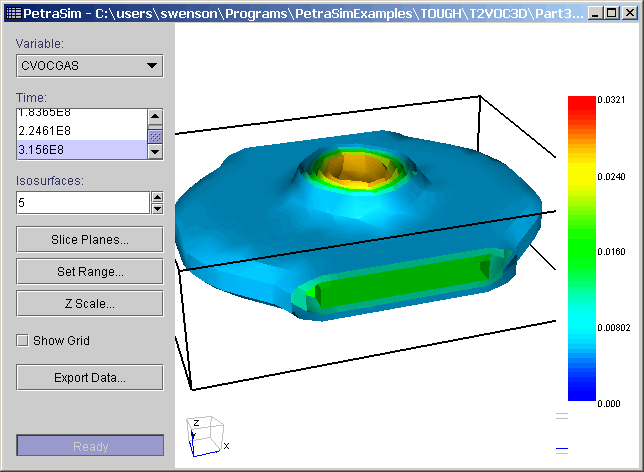
After the analysis is complete, select Results/3D Contours..., then select CVOCGAS as the variable to plot, and select the last time. The resulting iso-surfaces plot is shown below.
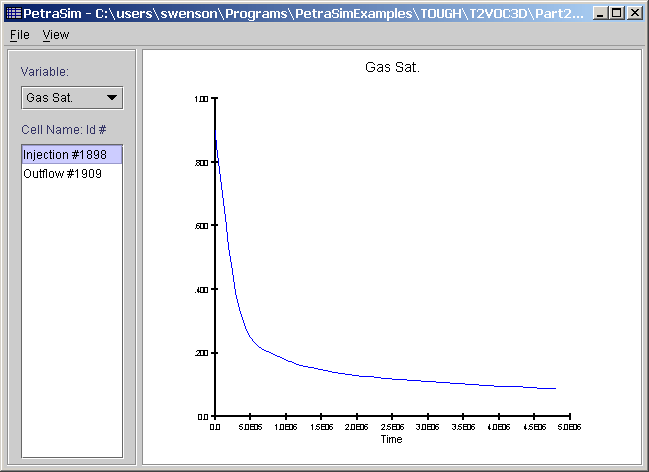
Select Results/Cell History Plots to make a time history plot of the cell data. All data stored in the TOUGH2 FOFT file is available for plotting. Unfortunately, for T2VOC analysis, the output data is rather limited. A plot of Gas Saturation is shown below in the injection element.
Close all results windows.
If not already open, start PetraSim and open the t2voc3d_part2 model. We will now save this model to a new directory. Select File/Save As and save the model as t2voc3d_part3. Put this file in a new directory that is different than the directory used for the first analysis. This is necessary because TOUGH2 writes output files to its current directory and we want to avoid overwriting that old analysis.
Note: If using PetraSim Version 1.1, with the September 20 release date, it is necessary to exit PetraSim, restart, and reopen the model file to synchronize the solver directory.
We will first read the results saved in the previous analysis as the initial conditions for the new analysis. Select File/Load Initial Conditions and open the SAVE file that is located in the directory in which the part 2 analysis was run.
To make sure these results have been loaded correctly, select Model/Edit Grid, go to the XZ view, select layer 7, and plot Gas Saturation.
In part 2 of the analysis, o-Xylene was injected. In this part of the analysis, we will stop the injection and let the o-Xylene diffuse for 3.156E8 sec (10 years). To remove the injection from the model, select Model/Edit Grid and go to layer 6 of the XY View. Select all the cells with source/sink boundary conditions, right click and then select Source/Sink from the pop-up menu. In this menu, unselect the check on the VOC Injection.
Close the Grid Editor window.
For part 3 of the analysis we will start at 0.0 and end at 3.156E8 sec (10 years).

Select OK to close the dialog.
Select Analysis/Output Controls… and change the output data frequency to every 25 time steps.

We have now completed the input necessary to write the T2VOC input file. First save the PetraSim file by selecting File/Save….
We will also save a T2VOC input file by selecting File/Write TOUGH2 File…and giving the name t2voc3d_part3.dat (the dat extension will be automatically added if not specified).
As before, execute the analysis by selecting Analysis/Run TOUGH2... . To start the analysis, select the Start button in the Run Tough dialog. At the end of the analysis, the dialog will change to indicate that the analysis is finished. Close the execution dialog.
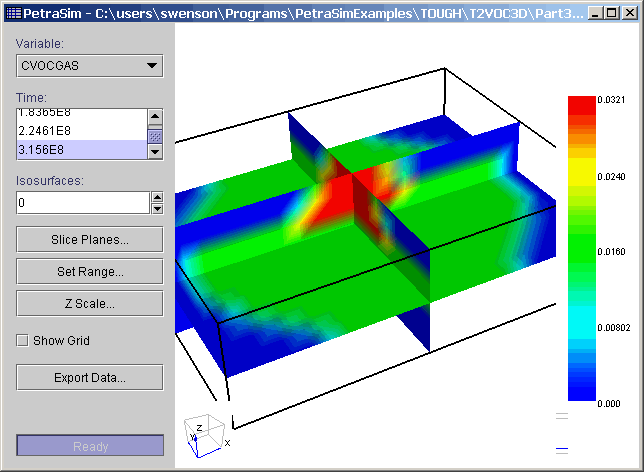
After the analysis is complete, select Results/3D Contours... and plot CVOCGAS at the last time, as shown below.
We can also turn off the isosurfaces and plot on slice planes. Note that since this is a relatively coarse mesh and the algorithm used to generate the contouring is relatively simple, there is some mesh dependence in the contour.
If not already open, start PetraSim and open the t2voc3d_part3 model. We will now save this model to a new directory. Select File/Save As and save the model as t2voc3d_part4. Put this file in a new directory that is different than the directory used for the first analysis.
Note: If using PetraSim Version 1.1, with the September 20 release date, it is necessary to exit PetraSim, restart, and reopen the model file to synchronize the solver directory.
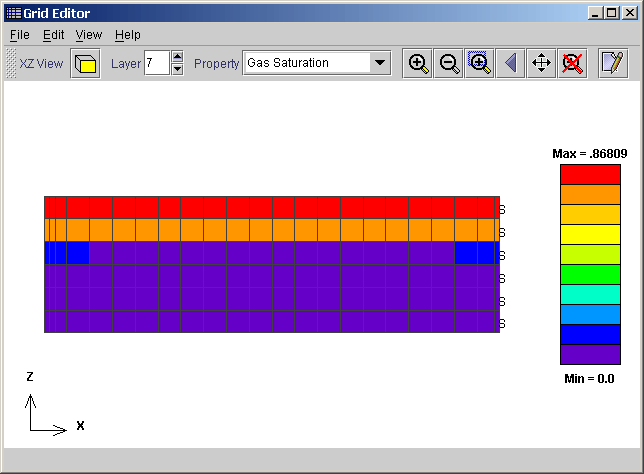
We will first read the results saved in the previous analysis as the initial conditions for the new analysis. Select File/Load Initial Conditions and open the SAVE file that is located in the directory in which the part 3 analysis was run.
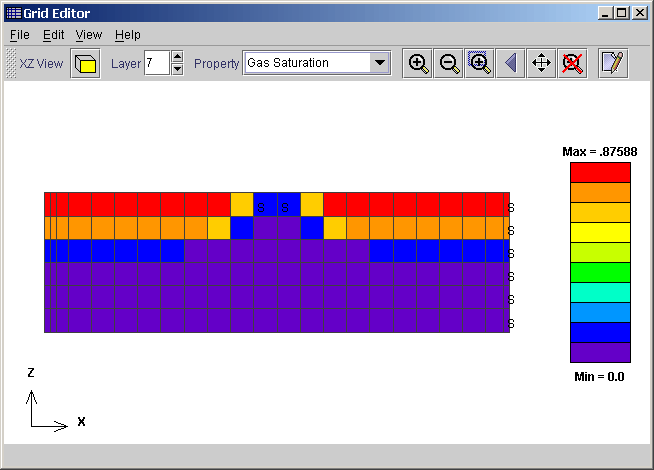
To make sure these results have been loaded correctly, select Model/Edit Grid, go to the XZ view, and plot Gas Saturation in Layer 7. Your display should appear as below.
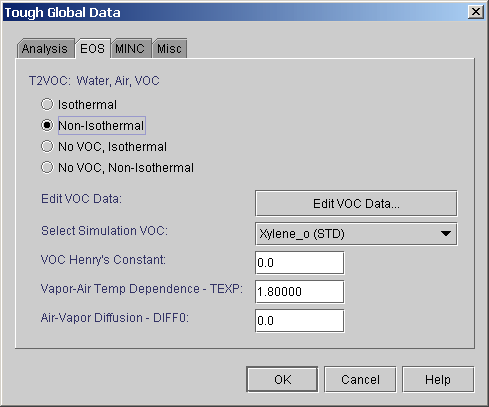
In this part of the analysis, we will inject steam into the model. To enable a non-isothermal analysis, select Properties/Global Properties and select the Non-Isothermal option.
Select OK to close the dialog.
In this part of the analysis, we will inject steam on the left side of the model. Select Model/Edit Grid and go layer 1 of the YZ View. Use click and drag to select all cells, then right click on these cells to display the pop-up menu. You can confirm that this is the left boundary of the model by looking at the 3D view.
For these cells, select Source/Sink and then Water/Steam as Injection. The injection rate for each cell is 1.48E-4 kg/s for each cell and the enthalpy is 2.676E6 J/kg.

Select OK to close the dialog and then close the Grid Editor window.
For part 4 of the analysis we will start at 0.0 and end at 1.48E7 sec (171 days). Change the maximum number of time steps to 5,000.
Select OK to close the dialog.
Select Analysis/Output Controls… and set the Print & Plot interval to every 100 time steps.

Select OK to close the dialog.
We have now completed the input necessary to write the T2VOC input file. First save the PetraSim file by selecting File/Save….
We will also save a T2VOC input file by selecting File/Write TOUGH2 File…and giving the name t2voc3d_part4.dat (the dat extension will be automatically added if not specified).
Note: If using PetraSim Version 1.1, with the September 20 release date, it will be necessary to edit the T2VOC input file to work around a bug in T2VOC when there are more than 100 sources and sinks.
To work around this problem:
1. Write the T2VOC input file by selecting “File/Write TOUGH2 File” and saving as “t2voc3d_part4.dat”.
2. In a text editor, such as WordPad, go to the bottom of the file and delete the “GOFT” line and the blank line that follows.
3. Save the modified “t2voc3d_part4.dat” file. Note: some editors add “.txt” to the end of the file. Make sure this is removed.
4. Start a Command window and go to the directory where you saved the “t2voc3d_part4.dat” file.
5. Run T2VOC by typing the following line, including the quotes and the space in Program Files:
“C:\Program Files\PetraSim\TOUGH2\T2VOC.exe” <t2voc3d_part4.dat >t2voc3d_part4.out
This will start T2VOC execution. The 3D analysis will run for a significant length of time (approximately 3 hours on a 600 MHz Pentium III). At the completion, you can plot the results in PetraSim as described in the example.
If you ran as described above, skip this paragraph. Execute the analysis by selecting Analysis/Run TOUGH2... . To start the analysis, select the Start button in the Run Tough dialog. At the end of the analysis, the dialog will change to indicate that the analysis is finished. Close the execution dialog.
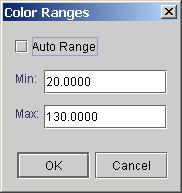
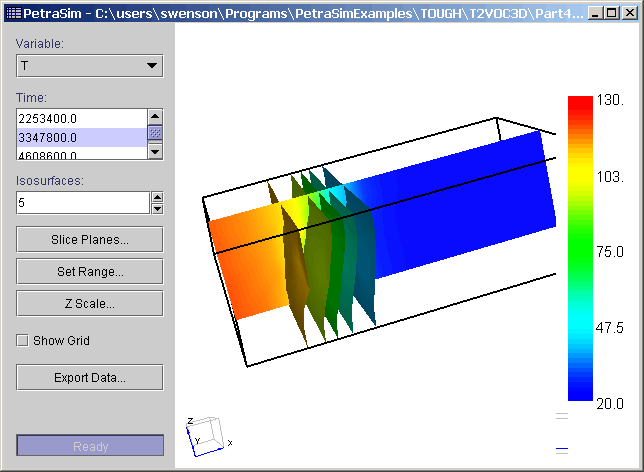
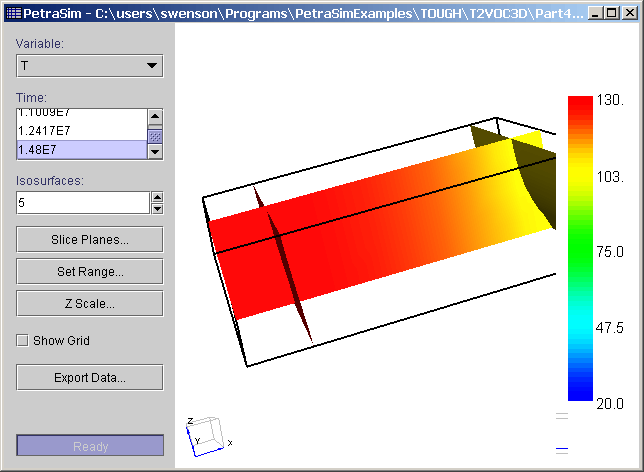
After the analysis is complete, select Results/3D Contours... . Again, define a Slice Plane on the Y axis at 7.5 m. Select T (Temperature) as the plot variable. We want to set the contour ranges so that they are the same for all plots. To do this, select Set Range and then turn off the Auto Range option and set the minimum temperature to 20 C and the maximum to 130 C.
Select OK to close the dialog.
Next, select the plot at time 3347800.0 sec (38 days). As can be seen, the sweep is warming the model.
At the last time, 1.48E7 sec (171 days) the entire model has been heated.
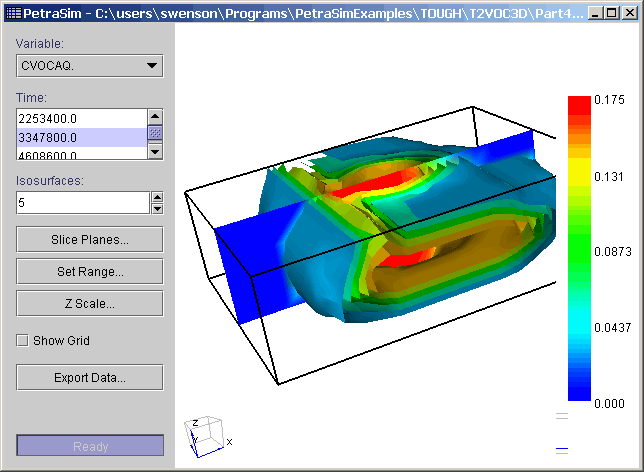
Next, select CVOCAQ as the plot variable at time 3347800.0 sec (38 days) and the display shows a fairly complex distribution, approximately corresponding to the temperature front.
Plots at the end time show that the VOC has been removed from the region.
This analysis has demonstrated a 3D analysis of initial conditions, spill of VOC, dispersion, and removal of VOC with a heat sweep. We would appreciate comments or suggestions.